

I have been rewriting Grub’s boot menu many times. However, I would like to post it here for some of you guys and also for my future reference in case I forget how to do it. There is a lot of things and options in Grub so I will not be able to cover them all. I will only show you how to add an OS to your boot menu.
NOTE: Before trying this out, read my tutorial on how to recover grub just in case something goes wrong.
To edit Grub menu, we must use terminal.
Edit Grub Menu
- Open Terminal: Ctrl+Shift+T or Applications -> Accessories -> Terminal
- We need to see what OS is on which partition. Use the command below.
df -h- The output will be something like this.
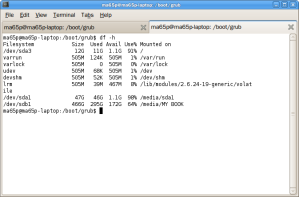
- Take note which OS is on what partition. You can do that by looking at the size of the partition. For instance, one of my partitions (sda3) has 12G and mount on “/”, I know that is my Ubuntu partition. Likewise, sda1 has 47G and is my Windows partition. Remember these details, you are going to need them later (in step 9).
- Navigate to the grub folder
cd /boot/grub - Open the menu.lst file in Gedit so we can edit the file
sudo gedit menu.lst - Enter your password. Gedit will open the file with root authority.
- Scroll down to the part where it look somewhat like this
title		Ubuntu

root		(hd0,2)

kernel		/boot/vmlinuz-2.....

initrd		/boot/initrd.img.....

quiet - Now, to add an OS, follow the example below
title		XP

root		(hd0,0)

makeactive

chainloader +1 - Copy all the options above and paste it into your grub menu.lst, right below the existing options, you only need to modify the title and your root.
In modifying your root, know that the hd0 means it’s your first hard drive, and the 0 after the comma tells the partition. My XP partition is insda1, therefore, my root is(hd0,0). IF it was insda2, my root would be(hd0,1). And so on,sda3would result in(hd0,2). Adjust your option accordingly. - After you are done modifying, save the file and close the application.

Now you have added a new OS into your booting.
Filed under: Howto, Other Applications, Ubuntu | Tagged: grub, restore grub | 5 Comments »

